Project Setup
This guide walks you through setting up your local development environment for Witty projects.
It is divided into two main parts:
- Cloning repositories from Gerrit using SSH
- Setting up the database and environment files (
.env)
1. Cloning Repositories
All repositories are hosted on Gerrit, and access is managed via SSH.
Generate SSH Key
If you haven't already, generate a new SSH key:
ssh-keygen -t ed25519 -C "username@witty.team" -f ~/.ssh/id_ed25519_gerrit
- Press
Enterto accept the default file path - Optionally add a passphrase
Your public key will be saved at:
~/.ssh/id_ed25519_gerrit.pub
Add SSH Key to Gerrit
-
Log in
-
Click your avatar in the top right → Settings
-
Go to SSH Public Keys
-
Paste the content of your public key file
To view the contents of your key, run:
cat ~/.ssh/id_ed25519_gerrit.pubCopy the entire line starting with
ssh-ed25519, then paste it into Gerrit. -
Click Add Key
Test SSH Access
Run this command to confirm your SSH access is working:
ssh -p 29418 <your-username>@gerrit.queenofgaya.com
You should see:
Welcome to Gerrit Code Review!
Clone a Repository
To clone a repository from Gerrit:
- Log in to https://gerrit.queenofgaya.com/
- From the top menu, click on Browse → Repositories
- Select the repository you want to clone
- Make sure the SSH option is selected
- Copy the Clone with commit-msg option URL
Example:
git clone "ssh://<your-username>@gerrit.queenofgaya.com:29418/<repo-name>" && scp -p -P 29418 <your-username>@gerrit.queenofgaya.com:hooks/commit-msg "<repo-name>/.git/hooks/"
Replace <your-username> and <repo-name> accordingly.
Common SSH Issues
Here are some common problems you may run into when trying to use SSH with Gerrit:
| Issue | Fix |
|---|---|
Permission denied (publickey) | SSH key not loaded or not added to Gerrit |
Authenticity of host can't be established | Type yes to trust the host when prompted |
| Wrong username or port | Use port 29418 and correct Gerrit username |
scp command doesn't work (especially on Windows) | Use curl method instead to install commit hook |
If you encounter the Permission denied (publickey) error, try manually adding your key to the session:
ssh-add ~/.ssh/id_ed25519_gerrit_witty
Recommended: SSH Config File
To avoid repeating your username, port, or identity file every time, add a custom block in your ~/.ssh/config file:
Host gerrit.queenofgaya.com
  HostName gerrit.queenofgaya.com
  Port 29418
  User chris
  IdentityFile ~/.ssh/id_ed25519_gerrit_witty
  IdentitiesOnly yes
This ensures Git and SSH always use the correct identity and username when interacting with Gerrit.
If scp Fails for commit-msg Hook
If you're on Windows or scp fails:
scp -p -P 29418 <your-username>@gerrit.queenofgaya.com:hooks/commit-msg "your-repo/.git/hooks/"
You can instead do the following after cloning the repo:
cd your-repo
gitdir=$(git rev-parse --git-dir)

curl -Lo .git/hooks/commit-msg https://gerrit.queenofgaya.com/tools/hooks/commit-msg
chmod +x .git/hooks/commit-msg
This hook is required for Gerrit to recognize Change-Id in your commit messages.
2. Database & Environment Setup
To securely access the shared development database, we use SSH tunneling instead of exposing the database server directly to the internet.
Why SSH Tunneling?
SSH tunneling creates an encrypted pipe between your local machine and the remote server. It allows you to connect to the remote database as if it were running locally — without opening any public ports.
This protects the database from external attacks and keeps sensitive credentials away from the public internet.
Learn more:
What We'll Cover
In this section, you'll learn how to:
- Set up the SSH tunnel to the database server
- Configure your
.envfile for local development
You won’t be connecting to the DB directly — only through the secure tunnel.
Setting Up the SSH Tunnel
To securely access the staging database, you need to create a dedicated SSH key for tunneling and send the public key to a DevOps engineer to whitelist it on the server.
Follow these steps:
1. Generate a Tunnel SSH Key
ssh-keygen -t ed25519 -f ~/.ssh/id_ed25519_dbtunnel_witty -C "db tunnel for witty staging"
❗ Do not add a passphrase when prompted — just press
Enter.
This will generate:
- Private key:
~/.ssh/id_ed25519_dbtunnel_witty - Public key:
~/.ssh/id_ed25519_dbtunnel_witty.pub
2. Send the Public Key
Run the following command to view your public key:
cat ~/.ssh/id_ed25519_dbtunnel_witty.pub
Copy the full output and send it to a DevOps engineer in the team (via Slack, email, or preferred internal channel).
Once whitelisted, you’ll be able to connect to the database securely via SSH tunnel.
Starting the Database Connection
Once your SSH key is whitelisted, you can start the tunnel to access the staging database securely.
1. Ensure Port 9108 is Free
Make sure port 9108 is not already in use on your local machine.
This is the local port that will forward to the remote database via the tunnel.
You can check with:
lsof -i :9108
If it’s in use, kill the process.
2. Locate the start-db.sh Script
Go to any backend repository you've cloned locally (e.g., Laravel or Node project).
In the root directory, you should see a script named:
start-db.sh
This script is included in all backend repos and is responsible for setting up the tunnel.
3. Run the Script
Open your terminal, navigate to the folder, and run:
./start-db.sh
This will open an SSH tunnel and forward the remote database to:
localhost:9108
You can now connect to the database using TablePlus, Sequel Ace, MySQL CLI, etc.
4. Get the .env.development File
Ask any developer in the team to share the env.development file for the project.
Copy it as your working .env.development file:
cp env.development .env
You’re now ready to run the app with full access to the staging database locally.
Whitelisting the SSH Key (for DevOps Only)
Once a new developer sends their public SSH key, a DevOps engineer needs to add it to the allowed keys on the tunnel user account (dbtunnel).
There are two methods: via terminal or via Webmin.
Method 1: Using Terminal (Recommended)
-
SSH into the V3 server:
-
Open the
authorized_keysfile:sudo nano /home/dbtunnel/.ssh/authorized_keys -
Scroll to the bottom and paste the new employee’s SSH public key on a new line.
-
Save and exit (
Ctrl + O, thenEnter, thenCtrl + X).
Make sure each key is on its own line.
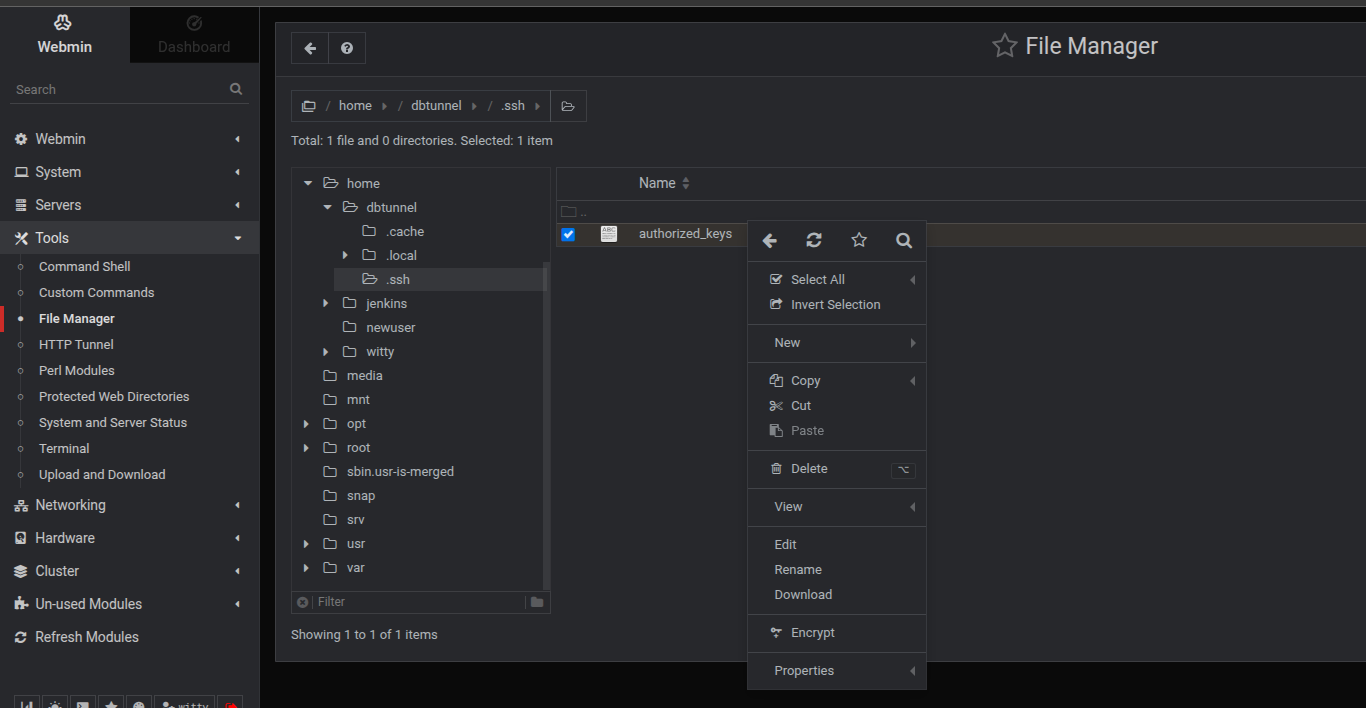
Method 2: Using Webmin UI (Recommended for non-technical person trying to update this file)
-
Log in with your admin credentials
-
Navigate to:
Tools → File Manager -
Open the file:
/home/dbtunnel/.ssh/authorized_keys -
Click Edit, scroll to the bottom, and paste the public key on a new line.
-
Save the file.
Once the key is added, the developer will be able to start the SSH tunnel and connect to the DB securely.